Table of Contents
eJavaToken VPN Logon
This article shows how to configure VPN Server, download Certificate and use eJavaToken/smart card to connect VPN. For any question, please contact javacardos@gmail.com .
Preface
Virtual private network also known as a VPN is a private network that extends across a public network or internet. It enables users to send and receive data across shared or public networks as if their computing devices were directly connected to the private network.
A VPN is created by establishing a virtual point-to-point connection through the use of dedicated connections, virtual tunneling protocols, or traffic encryption.
The core of VPN is to use public network to create a virtual private network. Windows Server2008 operating system has built-in support for VPN applications. Windows users can connect network access server that needs secure transmission via VPN, just like using dial-up to log in ISP server.
When establishing VPN secure channel, the server and the client needs to make the mutual authentication operation in order to establish a secure session keys which is used to complete follow-up information cryptographic operation.Windows Workstation allows users to use a smart card for user authentication to login client.This article takes Windows Server 2008 VPN routing software as an example to introduce the VPN server configuration.
Preparation
1. eJavaToken(Make sure that PKI applet has been already upload).
2. PC with Windows server 2008 (used to configure VPN Server).
VPN Server Configuration
To configure the VPN server, you need to Set up smart card certificate management environmentand Issue smart card certificate management .
1. In Role installation wizard, add Network Policy and Access Services, please refer to Windows2008 CA configuration method.
2. VPN access server configuration
* Right-click tree structure on the left of “Routing and Remote Access” console, select “Properties” from the pop-up menu.
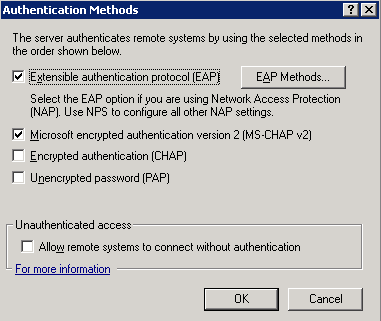
* In the “Properties” window, click “Security” tab, click “Authentication Methods…”, the dialogbox “Authentication Methods” will pop up, as the following shows:
- Select“Extensible authentication protocol (EAP)”. Extensible Authentication Protocol is the improvements method of traditional user name and password authentication. Smart card user authentication belongs to Extensible Authentication Protocol.
- Click “OK”, and close “Authentication Methods” dialogbox.
- Click “OK”, close “Routing and Remote Access Properties” dialogbox.
- New user: Select “Roles→Active Directory Domain Services→ Active Directory Users and Computers→server.javacardos.com→Users”, right–click this item and select “New→User” from the menu, as figure 010 shows. Then set new user’s username and password, as shown in figure.
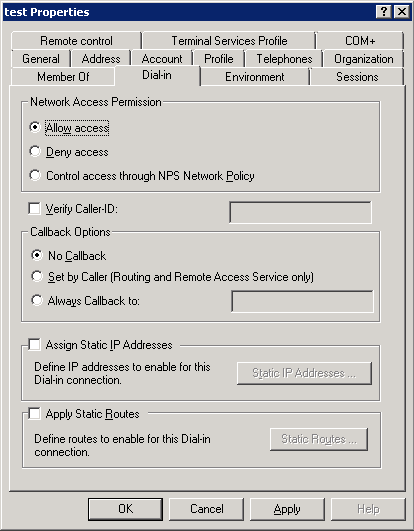
- Right-click the new user, select “Properties”, select “Dial-in” page. In “Network Access Permission” item select “Allow access” and then click OK, as shown below.
Note: After these operations, users can apply for certificate that is used for authentication.Keep in mind that you must use the user you just set to apply for certificate. Now, VPN access server configuration has been completed.Then we need to configure client software.
Download Certificate
- Insert eJavaToken into computer (Make sure that PKI applet has been already in eJavaToken).
- Open Internet Explorer, enter the url set in previous step, which is used to issue smart card certificate (e.g. 192.168.50.96/certsrv/certrqma.asp), press Enter.
- On Advanced Certificate Request page, select “Smartcard User” for Certificate Template option,select “EnterSafe ePass2003 CSP v1.0” for CSP option, then click Submit.
- Follow the prompts, select “Install this certificate” and click “Ok” until the certificate is installed successfully.
- If “This CA is not trusted” appears, please follow the prompts to add this CA into trust list.
After certificate is downloaded and installed successfully, you can view this certificate or apply for a new one. You can also click here to know more about download certificate.
VPN client configuration
Client configuration is completed on client computer. Take Win7 as an example.
- Firstly, make sure that eJava Token with certificate inside has been already inserted into computer.
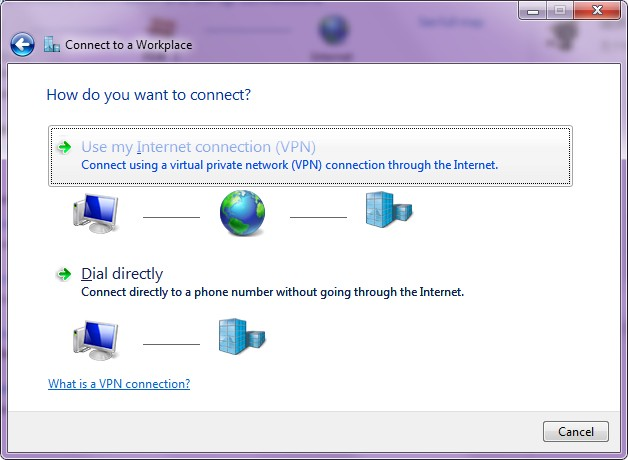
- Open Start menu, select “Control Panel”- > “Network and Internet”- > “Network and Sharing Center”- >“Set up a new connection or network”- >“Connect to a workplace”, open “Connect to a Workplace” dialogbox:
- Select “Use my Internet connection(VPN)”:
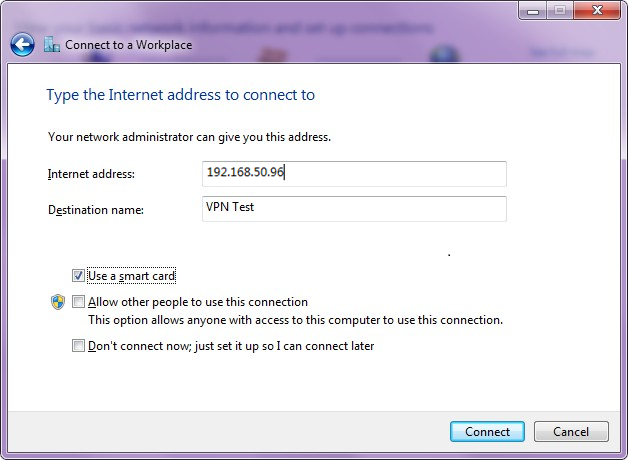
In this pop-up dialogbox, you should enter Internet address (IP address of VPN server, e.g. 192.168.50.96) and Destination name (the new VPN connection name), click checkbox on the left of “Use a smart card” and then click “Connect”.
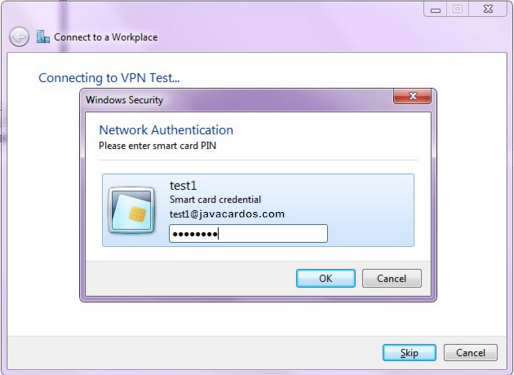
- The computer will recognize eJava Token automatically. You will be prompted to enter eJavaToken PIN code, click “OK”, as shown below.
Then you will see VPN connection name you set when you click the network access icon.
After these operations, the configuration of VPN client software is completed. To connect VPN, just double-click the new VPN connection name and click “connect” in the pop-up dialogbox.If VPN is connected successfully, connected mark will appear on the right of VPN connection name.
